Nails
10 Ways to Add Texture to Your Manicure
Nov
Whether it’s a classic super glossy cherry red, or a sophisticated, modern nude there’s nothing quite like a fresh manicure to make you feel pretty and put-together. But if you’re looking to up your nail game, it’s time to go beyond bold colors and beautiful finishes.
You’re probably familiar with nail art as adhesive decals or your manicurist’s steady handiwork.
But why stop there?
You can bring a whole new dimension to your nails by simply adding texture!
Whether you’re an aspiring nail artist or professional-level manicure maven, you’re sure to find a new favorite nail look below.
But, before we get started, there are few tips you’ll want to follow for each of the various nail art techniques:
- Make sure your nails are clean and dry before you get painting. Use nail polish remover to clean any trace of your last polish color from your nails.
- Trim or file your nails as needed, but you’ll probably want to keep this step to a minimum, as you’ll need plenty of space to create and show off your art.
- Don’t forget to apply a quality base coat! A good base coat will help polish adhere while also protecting your nail’s surface by acting as a barrier between the nail and any harsh or dehydrating ingredients in nail polish. Give your base coat time to dry completely so that you don’t ruin your design with still-wet base coat underneath.
- Keep in mind that depending on the textured look you’re doing, you may need to either allow your base color to dry completely, or you may need it to remain wet for the texture to adhere directly to the polish.
- The final thing you’ll absolutely need for each look: a high-quality top coat to protect your design and make it last longer. One you already have at home may do, but be sure to check if it’s a quick-dry formula. Some of our looks today will do better with a more traditional top coat instead of quick-drying varieties.
And now you’re ready for the 10 Ways to Add Texture to Nail Art:
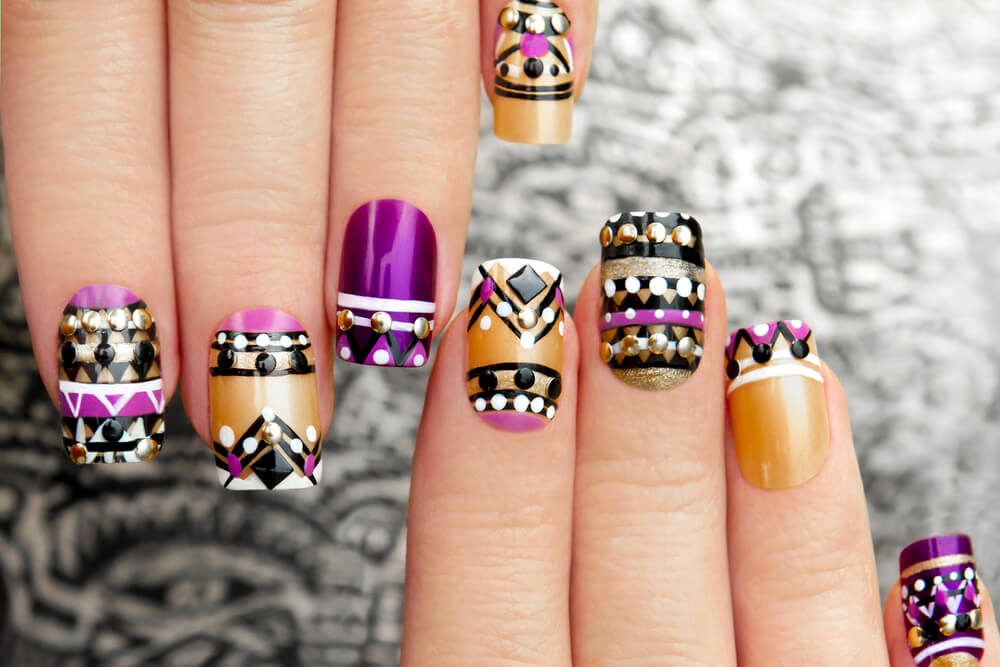
Add Rhinestones
Rhinestones are an awesome way to add not only texture but some attention-grabbing sparkle. This glamorous look can be anything from minimal to extravagant, depending on how many rhinestones you add to each nail.
To give yourself a rhinestone manicure, you’ll need a tool for picking up the individual gems and placing them on your nails. This could be a simple toothpick, pair of tweezers, or the wooden manicure tool known as the orange stick.
This tutorial recommends purchasing your rhinestones from a craft store rather than buying sheets of jewels specifically made for nails with adhesive already on the back. This is because these gems may not stick very well to nails once removed from the sheet.
Instead, try using nail glue or a good quality base coat to adhere the rhinestones.
After letting your base color dry, it is suggested that you use your chosen tool with a little bit of base coat to pick up a rhinestone gem-side up. Once you’ve picked up the stone, add your adhesive to the back and place it down on the nail. Be careful when putting the rhinestone on your nail so that you don’t disturb the polish underneath.
Continue applying the stones this way for your desired design. Of course, once you’re done, apply your topcoat, and don’t be stingy. You’ll want the top coat to really protect your rhinestones so that they don’t fall off.
Paint on Polka Dots
The classic polka dot may be one of the easiest textured nail art designs to add to your manicure. Depending on the size dot you’re aiming for, you could either use the built in applicator brush that comes with your bottle of nail polish, or for more dainty dots, use a fine tipped paintbrush. After painting on two coats of a base color, you simply dot one or more accent colors on top until your heart’s content. You can also build off of the basic look by arranging dots in geometric patterns, stars, or flowers—or something different on each finger.
Sprinkle on Sand
This beachy manicure is fun for all seasons and is much easier than you’d think.

After applying two coats of your base color (may we suggest something bright and colorful to enhance the beach vibes?), simply sprinkle ordinary sand over still wet nails and make sure it sticks to the polish.
Not near the beach? You can buy real sand anywhere by heading to your local home improvement store. Once it dries, seal with top coat and your mermaid style manicure is complete.
Stencil on Reptile Skin
This tutorial is for snakeskin nails, but could easily be modified to create a crocodile pattern.
To achieve the look of reptile scales, you’ll need to find a suitable fabric— one with some type of small openings, such as mesh, tulle, or fishnet.
- Apply two coats of your base color and let dry. Take pre-cut strips of the fabric and stretch them over your nail and apply the second color.
- The nail polish’s built-in brush could be used for this, but dabbing a makeup sponge in a small amount of polish is an alternative method that may allow you to control how thick the paint goes on and how thick the “reptile scales” are.
- Wait until this second color is almost dry and then remove the fabric carefully.
- Apply a light layer of top coat once the scales are completely dry to protect them. But, don’t go too heavy, or you may diminish the beautiful texture.
Apply Metallic Leaf
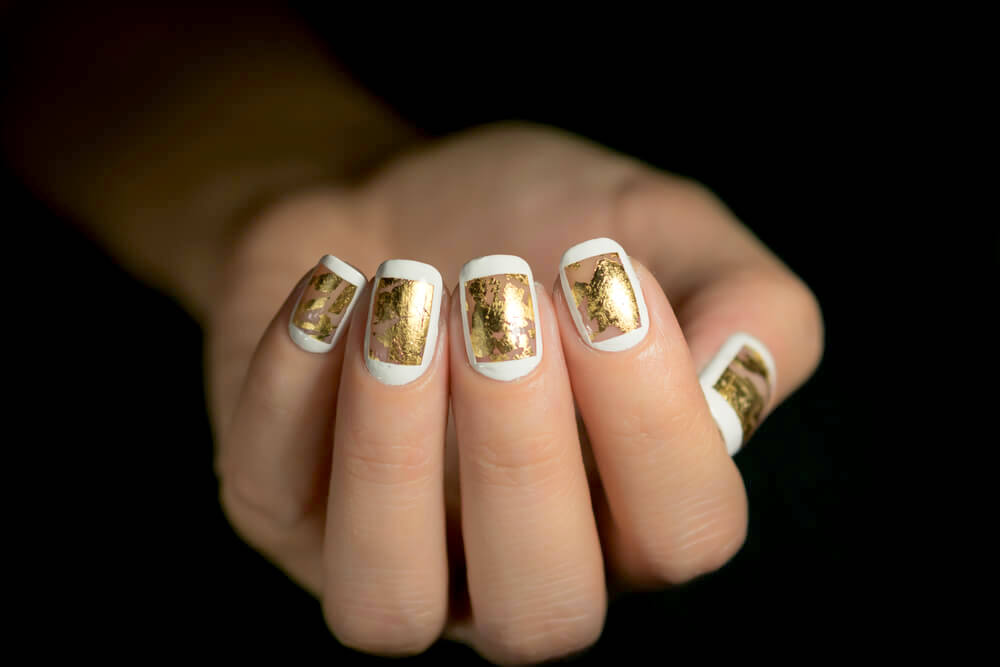
Achieve a gilded manicure using gold leaf or any other metallic leaf available at most craft stores.
- Choose a base color that will really contrast nicely with the metallic shine of the gold, silver or copper.
- Paint on two coats of polish, and when the second coat is no longer wet but not fully set it’s time to apply the leaf.
- Your best strategy is also to pre-cut the shapes you want to put on your nails. Gold leaf is probably the most fragile of these three metallics, so it may be best to go with a speckled look by flaking the gold across your nails.
- Make sure that the leaf has properly adhered to your base polish by gently pressing it into the paint with your finger.
- Finally, fully cover each nail with topcoat.
Splatter Your Polish
This might be the most fun texture to try on yourself or your friends at home.
You’ll need at least two different polish colors to work with, but the more the merrier. Don’t be afraid to go all out and use every color of the rainbow!
This amazing tip from professional manicurist Katie Jane Hughes is to use a bobby pin to create an authentic looking splatter pattern.
You’ll of course first want to spread out an old towel or some newspaper on the surface you’ll be using because you definitely don’t want to get nail polish all over your dining room table!
- Once you have all your tools ready, apply your base color, let dry thoroughly, and begin splattering.
- Put some of your first accent color into the loop of the bobby pin, and while dangling the pin above the nails, blow into the loop to propel the paint across the nails.
- Continue with any other colors as desired.
Yes, you’ll have a lot to clean up afterward… but the one-of-a-kind affect is so worth it!
Layer on Lace

Create a variety of looks with lace covered fingernails! This tutorial suggests using black French lace, but any lace you like could work.
You’ll first need to carefully cut pieces of lace to match the shape of each nail.
- Once this is done, choose your base color.
- Use your base color to paint two coats and let dry. Next, you’ll take your topcoat (for this texture it is recommended that you do not use a quick-dry topcoat, because it won’t adhere to the lace enough) and apply liberally.
- Place the pre-cut piece of lace for that fingernail on top of the wet topcoat, carefully pressIng it into place with your finger.
- Then let your nails dry completely.
- For your last step, trim any lace that is hanging over the edge of each nail, and you’re all set!
Gel Paint a Cable-Knit Sweater
The perfect look just in time for winter is inspired by your favorite cozy sweater.
Now, this one is a bit more intense in terms of the supplies you’ll need to achieve it. For this three-dimensional, cable-knit design you will need to use gel polishes in different shades of the same color, a quality fine-tipped nail art brush, and acrylic powder.
- After applying your gel base color in two coats, apply the gel topcoat and let dry.
- Then you will use your fine-tipped nail art brush to dip into a darker shade of your base color.
- Draw a chain pattern down the center of the nail, similar to what you would find on a sweater. It’s actually much easier than it sounds.
- Then add some dots and lines along the sides and it looks amazingly realistic.
- As an alternative, grab your favorite sweater or scarf to use as your inspiration.
- When you’re done painting, you will need to apply acrylic powder and brush off the excess.
If your gel polish requires curing under an LED lamp, you will then need to cure your nails as usual.
Use a Nail Stamp
The perfect way to add the illusion of a detailed and three-dimensional texture while maintaining a smooth nail surface is with a nail stamp. Nail stamps easy to use and come in almost any design you can imagine. The basic steps for stamped nails are as follows:
After doing the usual two coats of your base color, you will then use your accent color in the design you choose on the metal nail stamp plate. In this particular tutorial the nail plate comes with a scraper that you would use to remove any excess nail polish. You want to make sure that you are completely covering your plate design with polish but obviously, you don’t want any excess smudging around the edges of the design and ruining it. So that’s where the scraper comes in handy.

Then, use the actual stamp to transfer the polish design from the plate to your nail. Once your design is transferred onto the stamp you will carefully rock the stamp across the nail from one side to the other. You may get some of the design outside of your nail; this is okay, as you can clean up the edges after your designs have dried.
And as always, after everything is completely dry, cover with topcoat. You’ll be amazed at the ornate patterns you can create with minimal effort or skill!
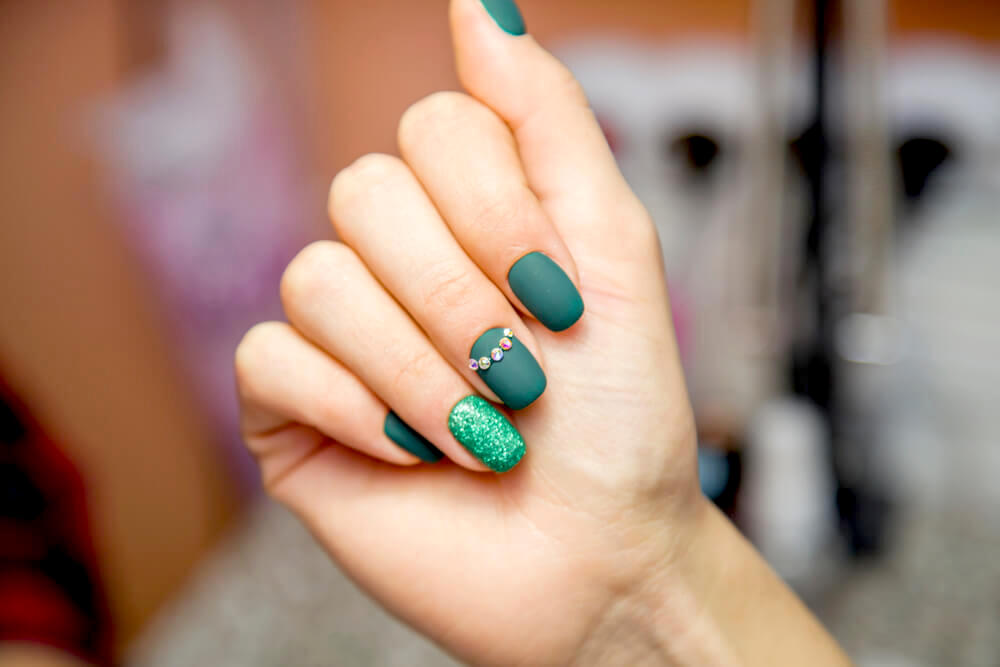
Cover in Swarovski Crystals
Now here is some major texture that looks seriously luxe!
Perfect for the most special of occasions, Swarovski crystals are a step up from the typical rhinestones with a double dose of sparkle and shine. You could add just a few along the cuticle or edge of the nail, but why not go all out?
For one or more Swarovski crystal-covered nails, start with a pretty base color—or even glitter polish!
- Once that is dry, apply nail glue to the nails and begin adding crystals with a toothpick.
- To add additional visual and textural interest, make sure to use various sized crystals, from small to large.
- This look is sure to turn heads, especially when combined with a brilliant accent color in a simple, glossy finish.
So there you have it!
From sparkly to edgy, and from beginner to advanced—no matter your style or skill level, there’s a perfectly textured manicure for everyone.